|
By Jerry Tardif
Back to Part 6
Next to Part 8
Wither Tracings
I thought I'd share the process of taking wither tracings in case any readers are considering having a saddle made for their horse.
Some fellow riders had expressed a little confusion about the process and concern about whether they could have any confidence of getting a properly fitting saddle using this method. I'm confident it should work and am comfortable with the approach.
Of course, I'll have some experiential evidence one way or the other when I receive and try the saddle and I'll let you know what I find.
The process starts by taking the shape of your horse's back.
To do so, I cut off the bottom horizontal part of a wire coat hanger.
I bent the remaining top portion to follow my horse's shape at the withers.
Then, I placed the hanger on a piece of paper and traced the bottom side that had touched and followed the contour down my horse's sides.

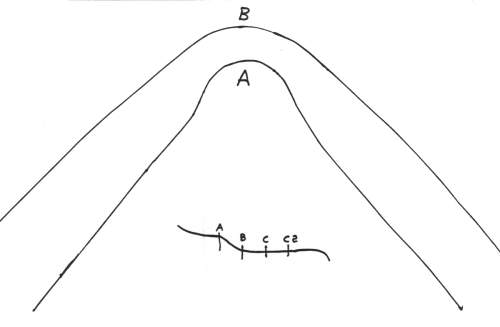
Image 1
Look at the legend at the center bottom of Image 1 above.
It shows the horse's back and from where each measurement/tracing is taken.
The "A" curve is taken at the withers.
I was surprised to see how narrow my horse's withers, and his back below the withers, really are.
He's an appendix quarter horse, so not as round and barrel-like as a typical quarter horse because of the thoroughbred contribution.
And he's solid, and well muscled — not underweight at all, but still thinner than I'd realized.
For reference, my horse is best fitted with a saddle having a semi-quarter horse bar tree.
So curve "A" is likely quite close for any horse fitting that size saddle tree.
Moving toward his tail, I re-bent it to follow his shape 5 inches behind that, traced it, and then repeated the step twice more in 5 inch increments.
The "B" tracing is taken 5 inches aft of that and you can see how his back is quickly getting rounder.
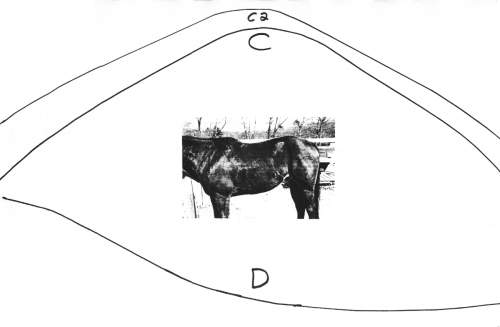
Continuing on through tracing "C" and "C2" shown in Image 2 (below), you can see the shape of how the saddle will flatten out.
The company states that tracing "C2" is not really necessary.
But because the saddle gauge has an arm for it and it helps to size the saddle, I figured I would avail myself of this additional opportunity to get the saddle sized "right" the first time.
As accommodating as Colin seems to be for his customers, I'd rather not lose the time necessary to return the saddle for an "adjustment" if it can be avoided by me providing all information "up front".

Image 2
Finally, I bent the straight hanger piece I cut off the bottom to follow his spine from his withers backward so it reflected the shape ( "D" ) of the top of his back where the saddle tree will sit.
And then I included a B&W photo showing his back's profile in an attempt to give the saddle maker every bit of information he/she might need to get the tree shape right.
I labeled each tracing as to its location, and when I got home, I included a page with my height, waist length, and weight, and also the accessories I wanted to order with the saddle.
This information packet of about four pages was then FAXed to Colin.
Once I placed my saddle order, it seems my current saddle instantly became less comfortable…go figure…
So, if you've ever considered having a saddle made specifically for your horse, this is all you have to do.
Then you'll be asked for your own measurements so the saddle seat fits you as well as the tree fits your horse.
Back to Part 6
Next to Part 8
Besides being an avid trail rider, Jerry Tardif is a technology consultant and a horse and nature photographer in SE Connecticut — see his work at: www.jerrytardif.com.
He is also co-founder and President of QueryHorse.
Back to Article Index
|